Thursday, August 29, 2013

How to Export Solid Models from NX and Import into Blender

Summary:
This blog post details how to import solid bodies into Blender from NX. As always there are many different ways to skin a cat, but I was only able to find particular combination of files types and tools to maintain solid body definition after the import into Blender. The assembly model I wanted to import from NX had over 50 different bodies and over 500 surfaces. Even trying to select all of the surfaces associated with a body and creating a group or linking them would be impossibly tedious and wasteful. Hopefully this information will save you time and effort as well!

Steps:
I'm going to use this part with two bodies, a cube with a square cutout and a cylinder, as an example and walk through the process.


1. Export the model from NX. I'm using NX7.5. File -> Export -> Parasolid


2. A new Export Parasolid dialog will pop up. Select the desired bodies to export or Ctrl+A for all bodies. The desired bodies should be highlighted and the OK button should become green/selectable. Click OK.


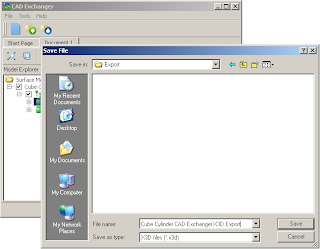
3. Browse to the desired output directory and name the output file. 


4. Download and install CAD Exchanger. Unfortunately this is not freeware or open source, but there is a free trial period (no idea the duration) and it was the only file converting utility I could find that could go from parasolid to x3d.

5. Open CAD Exchanger. Before we get started we need to enable "Merge Face Sets" in the X3D exporter options. Go to Tools -> Options. Click on "X3D exporter" in the left hand list. Check "Merge Face Sets". Click OK.


6. Start a new file, File -> New.

7. Import the recently exported parasolid file, File -> Import.


8. You can see a preview of the model and solid bodies in the tree to the left.


9. Export the model, File -> Export. Select X3D files (*.x3d) in the dropdown menu). Name and save the file.


10. Open a new file in Blender and delete the auto-generated cube. Your screen should look something like this. I'm using Blender 2.68.


11. Import the newly exported X3D file using File -> Import -> X3D Extensible 3D (.x3d/.wrl).


12. Browse to the X3D file, select it, and click "Import X3D/VRML2".


13. After rotating and scaling this is our cube and cylinder! Done!


Hope someone finds this helpful, I know it would have saved me quite a few hours of trial and error. Please post successful results or questions in the comments as well as if you find a free/open source file converter.


Thursday, August 22, 2013

Nissan Altima P1491 Check/Replace the Vacuum Cut Valve Bypass Valve on a 1998, 1999, 2000, 2001


Description:
This post describes one of the diagnosis steps for the P1491 codes on a 1999 Nissan Altima. Specifically the testing and replacement of the vacuum cut valve bypass valve. This applies to all second generation Nissan Altimas which are 1998, 1999, 2000, 2001.

The vacuum cut bypass valve is installed in parallel with the vacuum cut valve on the EVAP purge line that runs between the fuel tank and the charcoal canister.

Nissan EVAP Diagram

The purpose of the vacuum cut valve (white part in the pictures below) is to prevent the intake manifold vacuum from being applied to the fuel tank. The vacuum cut valve bypass valve is energized (opened) for diagnostic purposes to bypass the vacuum cut valve to apply the intake manifold vacuum to the fuel tank. This verifies the intake manifold vacuum.

Location:
The vacuum cut valve bypass valve (what a mouthful!) is located just inside of the passenger side rear tire, next to the gas tank and spare tire compartment. You can locate it by looking for the charcoal canister which is a large, black square box on the drivers side of the gas tank, and then following one of the lines until you see a white cylinder with four tubes coming out of it. That is the vacuum cut valve. The vacuum cut valve bypass valve is located on the same metal bracket as the vacuum cut valve. Here is a picture of the bracket/valve assembly after it has been removed.


In order to check the vacuum cut valve bypass valve we need to first remove the assembly.

Removal: 
Make sure your car is off, disconnect the battery and block the tires.

1. Slide the two hose clips away from the white vacuum cut valve and carefully remove the hose from the vacuum cut valve tubes. Twisting sometimes helps.


2. Remove the two 10mm bolts that hold the metal bracket assembly to the chasis. Be careful to no strip these bolts. I had one of mine strip and had to use mechanic wire to fasten the bracket in place. I suggest using PB Blaster well in advance of doing the actual removal and letting it soak. 


3. I like to save the electrical connector for last so that you can have the assembly dangling low for easy access. Push the green tab "in" and pull "out" on the exterior. You should be able to hear/feel a click when you get the green piece pushed in far enough.


4. Unbolt the vacuum cut bypass valve in order to diagnose it using the below steps.

Diagnosis:

Perform the exact same battery energizing test that I used on the similar EVAP purge solenoid valve. If you don't hear the solenoid valve click/move (or air passage) when power is applied then yours is bad!


For additional diagnosis steps for the vacuum cut valve go here.

Replacement:
I was only able to find a replacement over at Quality Resale Auto Parts (the website is a bit sketchy but they shipped the correct part, as described, and quickly) for $38 shipped. It's hard to beat that. Here's a comparison shot of the old vs. new solenoids. Why don't they encase/seal these parts better? Darn you northeast salt!


The steps to replace the assembly is just the reverse of the removal. 

Hopefully this write-up was helpful. Please feel free to comment about successes, or suggestions for improvements!

Friday, August 2, 2013

I AM NOT AMUSED - Pug Meme

A friend snapped this picture and I couldn't help but laugh at the indifference of the pug compared to the excitement of Laura holding the dog. I then couldn't help but create the next internet meme:

Pug Meme - I AM NOT AMUSED

Wednesday, June 12, 2013

Nissan Altima P0446 Evaporative System Canister Vent Control Valve Circuit

Description: 
This post describes the diagnosis and repair for the P0446 code on a 1999 Nissan Altima. This applies to all second generation Nissan Altimas which are 1998, 1999, 2000, 2001.

This website does a great job describing the function of the emissions system and the roles of the often confused VENT solenoid and PURGE solenoids. Below is my stab at a high level summary.

Basically speaking, the evaporative system on your car is used to route vapors from your gas tank into the combustion chamber to lower the ignition temperature to reduce NOx emissions. The VENT solenoid is used to control the flow of vapor into the combustion chamber. The PURGE solenoid is used to purge the excess vapors from the system and in the case of some manufacturers create the vacuum. The evaporative emmision control system throws a code when vacuum/pressure is not able to be maintained, which means there is a leak one of the lines or one of the two solenoids or the EGR valve is not working.

If that sounds like a lot of things can go wrong with this code, it is. You can chase this code for quite some time but there are three easy diagnostic tests that you can use to at least rule out components (or in my case find the problem!).

Steps:
1. Check/Replace Gas Cap - one of the most common and easily fixed causes for the P0446 code is a loose or defective gas cap. Without a tight sealing gas cap the evaporative system cannot pull a vacuum to extract the vapors from the gas tank. I recommend first checking to see if your gas cap is tight and clearing the code  If it comes back after driving, you might want to replace it for a few dollarsclear your code again. If it still comes back, move on to diagnosing other components.
2. Check/Replace the EGR Valve - this valve often gets caked with carbon deposit causing it to either seize or prevent it from holding a vacuum.
3. Check/Replace the Vent Solenoid Valve - because of the design (exposed housing, minimal sealing) and placement (low and behind a wheel) of this solenoid valve it is an extremely common/recurring failure point in the Northeast due to corrosion in the evaporative system. This ended up being what was wrong with my system.

Hopefully this helped and one of those three problem parts ended up being the source of your check engine code. If not, please post what ended up being your problem/fix so I can add to this post!

Check the EGR Valve on an a 1998, 1999, 2000, 2001 Nissan Altima

Description:
This post describes one of the diagnosis steps for the P0446 code on a 1999 Nissan Altima. Specifically the testing and replacement of the EGR Valve. This applies to all second generation Nissan Altimas which are 1998, 1999, 2000, 2001.

The EGR valve is a vacuum controlled valve which regulates the flow of exhaust gas into the intake manifold. The ability for the diaphragm portion of the valve to maintain a vacuum is essential for operation. This is what we are going to easily test in 5 minutes.

For more information on what this valve is or the function of the evaporative emissions system see my post about the P0446 Evaporative System Canister Vent Control Valve Circuit.

Location:
The EGR valve is located at the top center of the engine bay towards the rear firewall. See the picture below for location.


Diagnosis:
Warning: Make sure your engine is cool. You will be touching and working with metal components close to the engine and there is a potential to burn yourself on hot surfaces!
1. Before removing anything, reach up under the EGR valve "head" or disc like shape and push upwards on the diaphragm which is a flat surface located at the center of the valve housing. This should freely move up and down (with some spring back force). If it doesn't, your valve is clogged to the point that it cannot actuate. You can skip the rest of the diagnosis because you will need to remove it to clean or replace it.


2. Remove the passenger side hose using a flat-head screwdriver to assist in sliding the hose off.
3. This step will test the ability for the EGR valve to hold a vacuum. Push the diaphragm up as far as it will go and then place and hold your finger over the opening on the stem that the hose was just removed from. While keeping pressure on the stem opening, remove your fingers from applying upward pressure to the diaphragm. The diaphragm should stay where it is and when you now remove your finger from covering the hole it should snap into place. Do this multiple times to confirm that the EGR valve holds a vacuum. If the diaphragm returns to it's original position prior to uncovering the hole opening then the EGR valve needs to be cleaned or replaced.

Here is a great video on how to remove/replace the EGR as well as check that it holds a vacuum. Skip to 9:00 for the vacuum diagnosis test.

Check/Replace the Vent Solenoid Valve on a 1998, 1999, 2000, 2001 Nissan Altima


Description:
This post describes one of the diagnosis steps for the P0446 code on a 1999 Nissan Altima. Specifically the testing and replacement of the canister vent / purge solenoid valve. This applies to all second generation Nissan Altimas which are 1998, 1999, 2000, 2001.

For more information on what this valve is or the function of the evaporative emissions system see my post about the P0446 Evaporative System Canister Vent Control Valve Circuit.

Location:
The canister vent / purge solenoid valve is located just behind the passenger side rear tire, next to the gas tank. You can locate it by looking for the charcoal canister which is a large, black square box on the drivers side of the gas tank. The solenoid valve is attached to the front end of the canister.


In order to test the solenoid valve it needs to be removed and tested with an external 12V source.

Removal: 
1. Remove the 2 10mm bolts that mount the solenoid valve to the canister housing.


2. Separate the solenoid valve from the canister by pulling the valve straight out, towards the front of the car. It is held snugly by an o-ring.


3. Disconnect the vent hose from the solenoid valve. There are no claps/clips, just slide/twist it off.
4. Disconnect the electric connector from the solenoid valve by pushing the green release inward. I found it easier to do this last so that I could manipulate the valve as needed and use a screwdriver to push on the green release.


Diagnosis:
1. Attach an alligator clip to each of the two leads of the solenoid valve you just removed. Warning: Be sure the metal portion of the alligator clips are not touching each other! This will create a short when you connect it to the battery and fry/spark/melt your wires and/or damage your solenoid!


2. Attach one alligator clip to the positive terminal of your car battery and the other to the negative terminal of the battery. It doesn't matter which goes to which.


3. You should hear and feel the solenoid energize and close the valve. If this doesn't happen, check and make sure the clips are applied correctly. If it still doesn't happen it's likely that your solenoid valve is malfunctioning. If it does happen, clean one of the hose connections and try blowing through the valve. If you can feel or hear any air going through then the valve is not closing completely and needs to be replaced as well. See the video below of a valve that doesn't work. See the video in the replacement section for an example of a working valve.


Replacement:
I found the exact-fit OEM replacement made by Dorman through Advance Auto Parts. Part number 911-501. You can then do some internet bargain shopping to find it cheaper. I was able to find it on Amazon for half of the price:  Dorman 911-501 OE Solutions Vapor Canister Purge Valve.


Before installing the replacement solenoid valve, if you would like to hear/see/feel what a working valve feels like you can complete the diagnosis steps with the new valve. Hearing that click gave me peace of mind. The installation procedure is just the reverse of the removal.


Hopefully this write-up was helpful. Please feel free to comment about successes, or suggestions for improvements!