Wednesday, June 16, 2010

Life Suggestions

How many times have you gone to Google.com and entered in a random question. Often we treat the Google search engine as if it were the Deep Thought from Hitchhiker's Guide to the Galaxy. Deep Thought was commissioned to answer the question, "what is the meaning of life." The numerical result was of course, 42. Before we even get to the answer that we seek our Google search query, we are given the answer to a different question in the form of search suggestions. Before typing your question, as if being interrupted by a crowd of midgets on sugar highs, suggestions for the top 10 popular (but filtered I'm sure) searches appear.


These search suggestions are a mirror into our species. A compiled and condensed list of the most common burning questions on our collective minds. We may not like or even agree with what's there but there's no denying it. Especially when scanning the suggestions you find yourself wondering what the answers to some of them are and you're fighting the urge to search.

So here's my challenge, can you complete (and thus answer) all of the top 10 how-to questions of the human race at the same time? Now where's my rubix cube and my dragon.

Friday, April 30, 2010

TI-89 Calculator and 40D - Time-Lapse Magic

I was first inspired by this project by an instructable sent to me by a friend that shows you how to turn your TI calculator into an intervalometer which can then be used for time-lapse photography/videography.

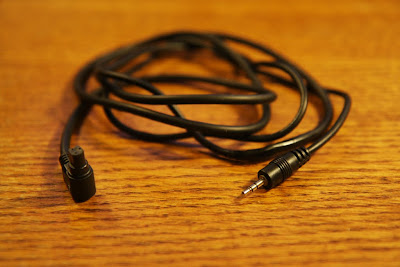
However, the camera used as an example in the instructable has a standard 2.5mm mini-plug instead of the N3 plug that my 40D has. So I needed to figure out how to get from the 2.5mm jack on the TI-89 to the N3 plug on my camera. It turned out to be pretty simple, order a remote shutter release cord and a 2.5mm cord and splice them. Here's the step-by-step:

1. Supplies
2.5mm cord
N3 shutter release
Wire cutter/striper
Electrical tape
Solder and soldering iron (optional)


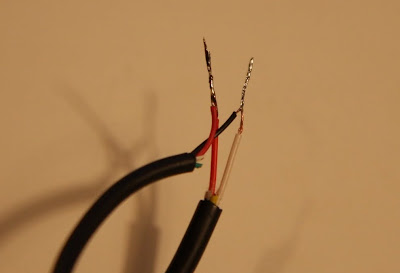
2. Cut the wires


3. Cut back about an inch of the outer sheath exposing the individual wires and strip the about a half an inch. Remember these wires only have half a dozen strands so they're very delicate.


4. You should have 3 from the N3 cable (Red - Shutter, Yellow - Focus, White - Common) and 4 from the 2.5mm cable (Black - Common, Red - supply, Green, White). If your colors are different you're going to need to use a bit of trial and error. I found it useful to open up the shutter release button, or take a look at this helpful diagram.


5. First try connecting the N3-white to the 2.5-black and the N3-red to the 2.5-red. Run the program on your TI. Make sure your camera is turned on and focused properly or in manual focus mode. If your camera snapped some pictures then great, your almost done! If not, then my suggestion is to use a multimeter to find the common on the 2.5mm side, connect it to the common on the N3 and then just through trial and error (twist the N3-red with each one of the other colors and run the program) determine which wire activates the shutter.


6. Once you have the correct wires you can solder them together for a more durable connection (optional)


7. Tape the connection up and you're done! Hope this helps, please post comments with questions or successful videos!

Thursday, August 20, 2009

Motivational/Demotivational Poster

1st draft of a motivational poster thought up by the Alabamian when we were getting ice cream from an automated vending machine one day. When we use this particular machine (not pictured below unfortunately), there's always an inherent fear that sucker tube that picks up the ice cream out of the freezer will drop the ice cream. At the same time it feels like you're using the force to get the ice cream. Hence the poster.


Credit: Alan

Sunday, August 16, 2009

Free Online Backup Review - Mozy MozyHome

A while back in my Ultimate Backup Solution post I mentioned that cloud (online) backups services were notorious for being too slow for any appreciable amount of data and, due to the service fees, too expensive relative to other backup alternatives.

A friend of mine soon after referred me to a service called Mozy Backup. Strange enough name, but hold on, they're advertising 2GB backups for FREE? Sounds too good to be true. 2GB isn't that much space, but if you were to distill all of your digital files, removing pictures and movies, leaving just the bare essentials like financial documents, it will definitely be under 2GB. Sure enough, mine weighed in at about 1.3GB. More than most I'm sure, but I'm a digital pack rat.

Signup/Install/Setup/Ignore

1. Visit Mozy and create a free account.
2. Download and install MozyHome
3. Select what folders you want to back up and configure other settings like frequency, what happens if a file is deleted etc.
4. Do nothing

The MozyHome desktop program makes it completely effortless to do backups as frequent as you want. If you only take advantage of the free 2GBs, it becomes a perfect application for backing up your temporary work/project directory where critical, in-progress things are stored that have yet to be archived because they're currently being worked on. Accidentally delete a file, find it corrupt, have a drive die... Mozy to the rescue!

The initial manual backup that I conducted, where all of my files had to be transfered, took a decent amount of time, but relatively short by industry standards. I was particularly impressed with the fact that I didn't notice performance glitches in other programs while Mozy was doing its thing. After the initial backup, when few or no files changed the checkup process was extremely quick sometimes less than a minute. Just for curiosity sake I added a few PDF files to my folder and observed the slight increase in backup time. Below are some raw numbers for you to crunch.

Test Data
8/8/09 Manual Backup 1.3GB 01:33:22 935 files transferred
8/9/09 Automatic Backup 00:00:35 0 files transferred
8/10/09 Automatic Backup 00:02:30 0 files transferred
...
8/15/09 Automatic Backup 3.3MB 00:02:11 12 files transferred
8/16/09 Automatic Backup 00:00:40 0 files transferred
Overall I think Mozy turned out to be a great find. I was unimpressed with online backup services in past but Mozy seems promising. I think one of the most attractive things about the service beyond the 2GB is the very simple and cheap pricing of $4.95/month!!! That's not a lot of pocket change for peace of mind with your digital life. I think my 68GB of pictures is a perfect candidate to start with!

Friday, August 14, 2009

Funny Saying from an Alabamian - Take 2

Alabamian: "are you still there?"
Chad: "yes, i'm trying to comprehend what you are saying"
Alabamian: "or are you simply enjoying my ramblings"
Chad: "it's not working"
Alabamian: "it never does or will"
Alabamian: "it's like watching a dog take a poop"
Chad: "..."

"btw what the crap is section modulus!?!"

"tell the excel add-in to kiss my butt
I just wrote an m file to do it for me."

"so Adam will implode under this rule?"

6/27/08 to 3/23/09

Wednesday, August 12, 2009

Funny Sayings from an Alabamian

"Jedi may come and go, but R2D2 will last forever"

Comic Strip:
Scene 1: Donkey recieves gifts/investments/loans from a China figure
Scene 2: Donkey distributes said gifts to poor, children, women etc
Scene 3: China taps Donkey on the shoulder wanting return on gifts but Donkey points to people he has given it to.

"Automation - Simply every engineer's dream to know the force"

"Periodic cycling adventures could occur. Meet in the Adirondacks, and kill each other type of things. God loves epic days."

"Just wanted to let you know that I've been aloting 8% of my paycheck into an investment that will give me a -100% return. It's called Social Security and Medicare."

"I don't enjoy the precense of other people who want me do to thier work for them."

Chad: "you realize how many of our conversations are probably overflow from your own convo with yourself?"

Through 3/23/09

DIY: Build Your Own Fire Pit

Last year my grandma (Meme) finally took the plunge and decided she wanted a fire pit. I offered to do all of the research and planning and my brother volunteered to help dig because that involved him driving the 4x4 to haul dirt. Whatever works right? There weren't many examples or resources to go off of so we used our neighbors as a example and winged it. I think it turned out pretty well so I'm documenting it in the hopes of helping someone else.

Difficulty:
Low
Time:
4-6 man hours
Tools:
Shovel
Wheel barrow (optional)
Rake (optional)
Material:
Sand ~3-5 50lb bags of sand depending on the fire pit size
Decorative rocks for the outer ring
Piping for stoking the fire (optional)

Steps:
1. Location

Arguably the most important step in the fire pit creation process is choosing the perfect spot. This was pretty easy for us because we have had cookouts my entire life in the same location. Before the fire pit we used a cutoff bottom of a 55 gallon drum to contain the fire. We ended up moving the center of the pit by about 6 feet in from the shore so that we could put chairs around the full 360 degrees of the fire. This was important to get the maximum number of people around the fire.


2. Sizing
To correctly size and locate the fire pit we placed rocks out in a circle to simulate the edge of the fire pit. We then lined the circle with lawn chairs and anything else to complete the ensemble. We ended up increasing the diameter of our fire pit by 2' to allow plenty of separation from the fire to the edge of the pit and the rocks and grass. This ended up being a wise decision because we can actually pull our chairs up close and put our feet in the warm sand.


3. Dig
Take a spade and inscribe a circle in the placeholder rocks. Remove the top layer of sod from your circle and take it somewhere that needs it (I'm sure you have a spot). Then start digging a bowl shaped hole. We ended up making the center around 2.5' deep and then gradually coming up to ground level at the edge of the circle. Remember there's going to be a layer of sand on top of this so keep the edge of the circle vertical for a few inches.


We also had a little helper name Riley!


4. Piping
We chose to incorporate a ventilation idea that my brother came up with. We have some old 2' sections of 6" diameter ceramic tile laying around that were used for septic laterals back in the day. They've been out of the ground for years and are assumed to be sterile :). After we finished digging the main pit we dug a channel for the pipe to fit in. We put one section of it basically horizontal with the end about 6" offset from the center of the fire pit and slightly protruding from the sand. We then cut angles on the end of that and the beginning of the next piece. This allowed us to place the second at an angle so it protruded out from the ground about 6" outside of the fire pit. Using this we can blow or use a billows to stoke the fire from a distance.


5. Sand
Make sure to pack the dirt by stepping on it or using a shovel so that it doesn't mix easily with the sand. We then put a 3-4" layer of sand in the fire pit. We used a rake to even it out and make it nice and smooth.

6. Rocks
For the finishing touch add some decent sized rocks to cover fire pit circle where it transitions from sand to dirt/grass. We didn't have large enough rocks so we ended up using a couple layers to get the effect we wanted. If you can, make sure to choose rocks that haven't been in the water. The rocks can absorb water that can flash boil when exposed to enough heat, causing the rock to explode.


7. Enjoy