Wednesday, June 12, 2013

Check/Replace the Vent Solenoid Valve on a 1998, 1999, 2000, 2001 Nissan Altima


Description:
This post describes one of the diagnosis steps for the P0446 code on a 1999 Nissan Altima. Specifically the testing and replacement of the canister vent / purge solenoid valve. This applies to all second generation Nissan Altimas which are 1998, 1999, 2000, 2001.

For more information on what this valve is or the function of the evaporative emissions system see my post about the P0446 Evaporative System Canister Vent Control Valve Circuit.

Location:
The canister vent / purge solenoid valve is located just behind the passenger side rear tire, next to the gas tank. You can locate it by looking for the charcoal canister which is a large, black square box on the drivers side of the gas tank. The solenoid valve is attached to the front end of the canister.


In order to test the solenoid valve it needs to be removed and tested with an external 12V source.

Removal: 
1. Remove the 2 10mm bolts that mount the solenoid valve to the canister housing.


2. Separate the solenoid valve from the canister by pulling the valve straight out, towards the front of the car. It is held snugly by an o-ring.


3. Disconnect the vent hose from the solenoid valve. There are no claps/clips, just slide/twist it off.
4. Disconnect the electric connector from the solenoid valve by pushing the green release inward. I found it easier to do this last so that I could manipulate the valve as needed and use a screwdriver to push on the green release.


Diagnosis:
1. Attach an alligator clip to each of the two leads of the solenoid valve you just removed. Warning: Be sure the metal portion of the alligator clips are not touching each other! This will create a short when you connect it to the battery and fry/spark/melt your wires and/or damage your solenoid!


2. Attach one alligator clip to the positive terminal of your car battery and the other to the negative terminal of the battery. It doesn't matter which goes to which.


3. You should hear and feel the solenoid energize and close the valve. If this doesn't happen, check and make sure the clips are applied correctly. If it still doesn't happen it's likely that your solenoid valve is malfunctioning. If it does happen, clean one of the hose connections and try blowing through the valve. If you can feel or hear any air going through then the valve is not closing completely and needs to be replaced as well. See the video below of a valve that doesn't work. See the video in the replacement section for an example of a working valve.


Replacement:
I found the exact-fit OEM replacement made by Dorman through Advance Auto Parts. Part number 911-501. You can then do some internet bargain shopping to find it cheaper. I was able to find it on Amazon for half of the price:  Dorman 911-501 OE Solutions Vapor Canister Purge Valve.


Before installing the replacement solenoid valve, if you would like to hear/see/feel what a working valve feels like you can complete the diagnosis steps with the new valve. Hearing that click gave me peace of mind. The installation procedure is just the reverse of the removal.


Hopefully this write-up was helpful. Please feel free to comment about successes, or suggestions for improvements!

Friday, December 14, 2012

Timberman 70.3 Ironman Goal Setting using Data

A little more than a month ago I signed up for the Timerberman Ironman 70.3, aka Half Ironman, in August of next year (8 months away). I've done a few sprint triathlons over the last couple years and really wanted to step it up in 2013. Ideally I would have liked to do an Olympic distance triathlon as a stepping stone, but life got in the way of that this year so I decided to take the jump.

Obviously one of the first thoughts that enters your mind after registering (apart from the, "oh no, what did I get myself into!') is, "how do I properly train for this event"? There are tens if not hundreds of books written specifically about training for various distance triathlons. So I won't pretend I know anything about the actual training part, though I hope to learn more, maybe even pick up a book or two on it. Instead I'll focus on the often overlooked step before that, setting a goal for yourself. This can range from just finishing, to a specific time, to a place in your age group (male, 25-29). I chose to set a time-based goal, and as all good engineers do, I need a basis for the time that I choose, I can't just pick it out of thin air. That would be just silly.

Past Performance

Most (sane) people considering an event like this have some experience with triathlons or at least some of the individual sports. I've got a bit of both so I'll summarize my "race" history here:
  • Swimming: 
    • 800 meter freestyle race (highschool, a long time ago I know, but still a data point): 10:30
    • 1.2 miles lap swim (self-timed): 31:26
  • Running:
    • 5k GE Run: 25:29
    • 13.1 Skunk Cabbage Half Marathon: 2:04:00
  • Biking
    • HMCC Century: 6:10:00
  • Triathlon
    • Hudson Crossing Sprint Tri
      • 500 yd swim - 0:08:11
      • 12m bike - 0:36:51 
      • 5k run - 0:25:40
If I use my Hudson Crossing pace of 1.6 min/hundred for the swim, 19.5 mph for the bike and 8.25 min/mile for the run, that would equate to 0:33:36 for the 1.2 mile swim, 2:52:18 for the 56 mile bike, 1:48:04 for the 13.1 mile run, at Half Ironman distances. Adding in 5 minutes for transitions puts me across the finish line at around 5:19:00. As you would expect, when you compare the scaled times to the individual events that I've done for the run and bike, they are significantly faster. However I keep a pretty consistent pace for the swim regardless of distance (which means I must have been dogging it on the sprint tri!) Scaling those sprint tri paces to the Half Ironman distances may seem impractical, but I have a lot of room to improve, plus, it's a starting place.

Now lets take what we know and compare it to the results of my age groups for this specific race and course even. Fortunately there was data, broken down by event, from the website for '09-'12 for me to play with! I just looked at the data for my age group, male 25-29. I took the individual event times and plotted them versus the overall finish time. This allowed me to do two things. First, I was able to see trends for each of the individual diciplines and how they varied with overall finish time. Secondly, this allows me set a goal of a particular finish time and determine what each time would need to be based on the trendlines from the data. Here's the plot for your viewing pleasure:


(click to enlarge)

One of the interesting things that is very apparent is as the total time increases the variation in the run and bike times becomes huge. My guess is that this is most likely from those participants being really strong in one sport and not in the other. That or killing themselves on the bike and bonking on the run (foreshadowing?).

Finally, I chose 6 hours as my goal finish time. Partly because it was a nice round number and partly because it allows plenty of cushion from my scaled sprint triathlon time. If I use the trendlines (basically the average person) that gives me the following breakdown:

0:38:00 Swim, 3:05:00 Bike, 2:16:00 Run

I think that I can do the swim in around 33 minutes, which plus the 2 minute transition time, gives a few minutes of extra time to distribute between the bike and run. Heck, add it all to the run! So the final goal breakdown is:

0:35:00 Swim (Includes T1), 3:05:00 Bike (Includes T2), 2:19:00 Run

Hope you find this method helpful or at least interesting. Good luck!


Friday, August 24, 2012

Tab Overload

I'm a huge fan of tabbed browsing. It's the only way I can keep up with the multitude of people and topics vying for my attention. I can't imagine ever browsing without it. Though, I suppose the 30+ second load times for a single page with dial-up had a lot to do with it. But I've learned that there's such a thing as too many tabs, and Chrome has a good way of telling me when I've reached that magic number:


Chrome certainly lets me indulge my tab addiction, finally unable to display text (icon only) at 21 tabs and at 42 can't even display icons anymore (@ 1280x1024). More and more research has shown multitasking decreases overall productivity. I find that's especially true with my researching/browsing when I don't "complete/finalize" a thread of thought or tangent of research, examples of which would be looking up a definition or following a source. Having too many tabs is overwhelming and distracting, and when I realize half of them are obsolete and take a second to close them out, things become much clearer/cleaner. So here's my goal and a suggestion, after reading an article that warrants no further research or copying an image/quote from site that I want, close it. With history and google, it's easy enough to find it again if needed so why not keep things clean and increase productivity.

Thursday, June 7, 2012

How to Change DNS-323 Gateway IP

I recently installed a new D-Link router (DIR-655... yay gigabit!) on my network which has my DNS-323. I had the network up and running in no time after the typical reset-modem-reset-router dance and an obligatory call to the ISP's outsourcing call center located in India. The finishing touch was to plug in my DNS-323 and check out my new blazing fast transfer rates. I plugged it in and typed in the NAS static IP address that I had memorized... nothing. I realized that the default D-link router IP address (192.168.0.1) is different than the previous Linksys router (192.168.1.1). Meaning that my DNS-323 is probably using the wrong gateway. I was excited to find after a cursory Google search that someone had posted on the D-Link forums with an almost identical issue. The only responder suggested changing the IP of the new router to match the old. After a few unsuccessful IP changes which resulted in me having to reset the router back to factory settings (not fun), I realized that there has to be an easier way, a way to update the gateway of the NAS without being able to get into the settings through a browser. Then I remembered the D-Link Easy Search Utility. Duh...

Steps:
1. Put in the D-Link DNS-323 Install CD. If you don't have the original CD that you can download just the Easy Search Utility from D-Link here.
2. Open the Easy Search Utility program.
3. If your NAS doesn't show up automatically, press the Refresh button.
4. Highlight the desired NAS by clicking on the name.
4. Change the gateway and IP to match your new router's convention.
5. Click Apply. (while you're here you can easily mount your new drives using the tool)
6. Enjoy!


Wednesday, August 3, 2011

Build Your Own Ladder Golf Set Using Official Dimensions

There are quite a few variations of rung geometry, both horizontal/vertical spacing and diameter. There are no official dimensions so I chose to go with spacing consistent with the most reliable source, laddergolf.com, which says:

Glossary of Terms:

Bolas: A Bola consists of 2 golf balls attached together with a piece of nylon rope. Golf Balls are spaced 13” apart.
Ladder: The ladder is the structure that consists of 3 steps each spaced 13 inches apart.
Steps or Rungs: Each ladder has 3 steps. The top step is worth 3 points, the middle 2 and the bottom 1 point.
Toss Line: The line that the players tosses from. Officially is set to 15 feet. For backyard games 5 paces works fine.
By using vertical pieces about 12” in length after the T’s are assembled it gives a spacing of about 13”. I chose to go with 3/4” PVC for durability reasons. Many people complain that 1/2” cracks or breaks after a fair bit of use.


Ladder Golf DIY Dimensions

Step 1: Materials
For 1 Rack
  • 19ft. of 3/4” PVC straight pipe
  • 2x 3/4” PVC 90 elbows
  • 6x 3/4” PVC Tees
  • PVC Glue
For 2 racks, double the above materials.

2 Sets of 3 Bollards:
  • 12’ of ⅜” rope
  • 12 golf balls
  • Some masking tape
  • Something to melt the ends of the rope with
Optional: Spray paint (your choice of color) - I suggest using “Krylon Fusion for Plastics”

Step 2: Cutting and Drilling
  • Cut the 18ft of 3/4” PVC into 5x24” and 8x12” pieces.
  • Drill a 3/8” hole through each golf ball (Be careful with newer golf balls that have a liquid core... it could get messy!)
Step 3: Painting (Optional)
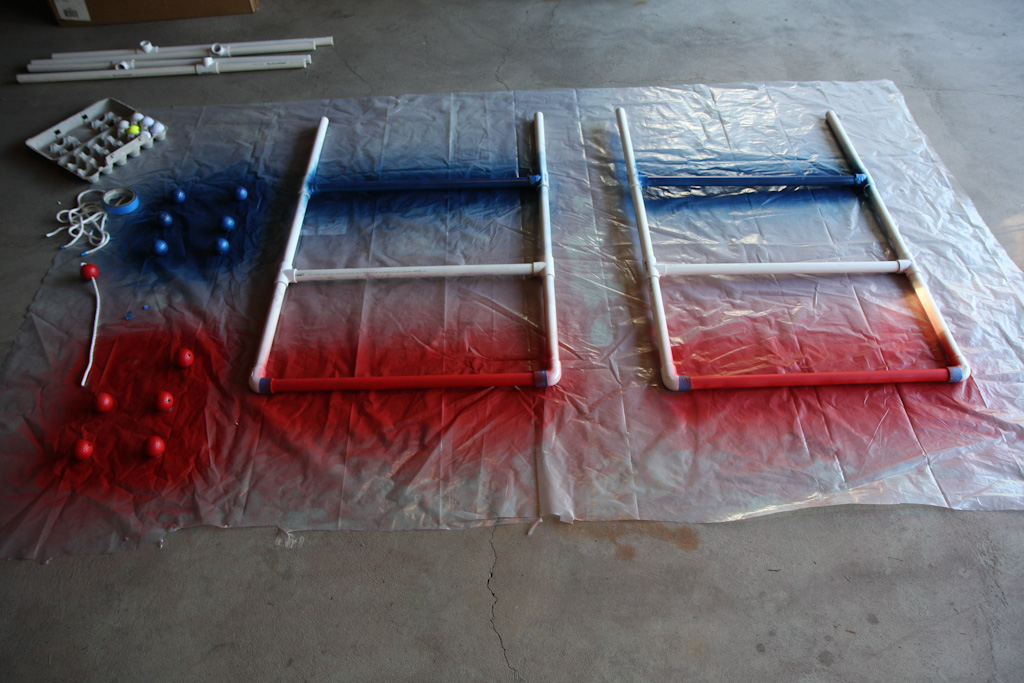
  • Before you assemble things is a great time to paint things to make the set a bit more playful and colorful. I chose to go with patriotic colors Red and Blue, leaving one rung PVC White. And colored different bollard sets red and blue.
  • Lay the pieces you want to paint out on a piece of plastic or cardboard and spray away. Make sure to get an even coat or two.
  • Give the paint plenty of time to dry

Step 4: Cutting and Melting
  • Wrap tape around the 3/8” rope every 24” (This will keep the rope from fraying when you cut it, and aid in the melting process)
  • Cut in the middle of each piece of tape
  • Melt one end of the pieces of rope using a lighter (Be careful and make sure that the melted portion doesn’t get larger than the 3/8” otherwise it won’t fit through the golf balls!)
  • Tie a knot in one end of a piece, thread two balls on, and tie a knot on the other end making sure the balls are 13" apart. Cut the excess rope after the knot and melt the second end using the same process with tape as above.
  • Remove the tape
Step 5: Assemble
  • Before you begin gluing think about how you are going to store and transport the set, which will tell you which joints not to glue to allow disassembly. I glued the entire rack except for the feet to the frame.
  • Glue the desired joints and let the glue set.
Step 6: Play!!!!

Monday, July 11, 2011

Download and Google Map Lowrance iFinder H2O Trail Data


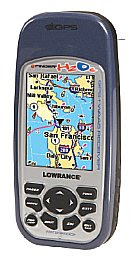
I'm creating this post because there wasn't really a consolidated step by step on how to get from the GPS SD memory card (or MMC as Lowrance calls it) to the computer, to the correct file type and then to a presentable fashion in Google Maps.


Step-by-step:
1. Save your trail data to the memory card by going to Menu -> System Setup -> Transfer my data. Choose Save, then name the file and choose Save Data.
2. Remove and plug in your memory card to a card reader connected to a computer
3. Copy the previously named .USR file from the memory card somewhere on your computer
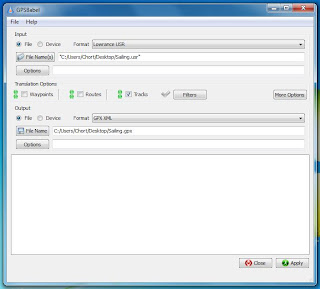
4. Download, install and run GPSBabel (free). For the input file select Lowrance USR and locate the file on your computer. For the output file, select GPX XML and name the output file. In the Translation Options section you can choose what types of data you want to convert and in this case all we're interested in is Trails. Under More Options I like to check Preview in Google Maps, just to make sure I have the right maps before proceeding. Click Apply.

5. Go to www.gpsvisualizer.com and choose your converted GPX file.
6. From here I like to see which trails I actually want to show and if any manual data modification is necessary. Then I use a text editor, Notepad++ if you don't have a favorite, to make the fine tune adjustments before repeating step 5.
7. You can download the map for local desktop use only, send a temporary link to your friends, or request a Google API Key and replicate the map on your own site like I will hopefully do in the next couple posts.


Enjoy!

Wednesday, June 29, 2011

Mt. Marcy by way of Johns Brook Trail

Last weekend myself, my girlfriend and three of our friends climbed Mt. Marcy, the highest point in NY. It was a great accomplishment for me (as well as a few others in the group) for a couple of reasons. It was my first overnight hike in addition to being the furthest (14 miles) I've hiked in a single day, the record was previously 11 miles to Buttermilk Falls that I did more than a year ago. I've also never planned a hike for such a large group that involved considerable research and the right gear.

Planning:
For those of you planning to hike Mt. Marcy there are three different (primary) ways to ascend Mt. Marcy. At 7.4 miles, the Van Hovenberg Trail is the easiest and shortest, starting from the Adirondack Loj (aka the ADK). The second route, the one we chose to hike, is via Phelps and Johns Brook Trail at around 9.1 miles each way with the trailhead at the Garden in Keene Valley. The third and most difficult ascent is via the Great Range Trail at 13.5 miles each way. We chose Johns Brook because we wanted to make it an overnighter and it had the most camping sites and lean-tos along the way, as well as Johns Brook Lodge (JBL) 3.5 miles in for water refilling.

After selecting our desired trail the next step was to create a rough itinerary and list of gear and supplies required for the trip. Here's what I ended up packing. Note that

Wearing:
- Non-cotton shirt
- Athletic shorts
- Hiking socks
- Hiking boots
- Underwear

Packing: (In a hiking backpack)
- Extra non-cotton shirt
- Extra Hiking Socks
- Extra Underwear
- Rain Jacket
- Fleece for cold/night
- Non-cotton Long sleeve shirt for another layer
- Bug Spray
- Sunscreen
- Toothbrush/Toothpaste
- Wipes
- Deodorant
- Plastic bags for feet
- Camelback (100 oz)
- Nalgene (1L)
- Sunglasses
- Sleeping Bag
- Headlamp
- Map
- Tent
- Bearproof canister

Optional:
- Rope
- Knife
- Compass
- First Aid
- Duct Tape
- Camera
- GPS
- Phone
- Water purification

- Along with this we also had a meal and a fresh change of clothes waiting in the car for when we returned the second day.

All said and done my pack weighed 45lb with water but I had an oversized (and overweight) pack, a $5 heavy sleeping bag and a bunch of food and supplies (most of the optional stuff) that I didn't need. In the future I'll shoot for 30-35lb.

The Trip:
With all of our gear loaded up in the back of the Rav, we headed off to Keene Valley around 2pm on Saturday for an arrival at the trailhead around 4:30pm. The first 3.5 miles to JBL, and our campsite, took 2hrs 5mins. Compared to the walk back it seemed like a cakewalk with all of that gear, food and water. By 7:30pm we had our tents set up and were settling down for the evening for a nice game of ERS and storytelling. The next morning we were up at 6am, breaking camp and eating breakfast. We started our ascent at around 7:15am with smaller, lighter packs, leaving our camping gear behind and it took us 4hrs and 10mins to summit. The hike up was very damp, but a lot less difficult that I expected. Instead of a sloped well-beaten path it was a narrow fairly flat path with steep rock/bouldery climbs in between. It made for by far one of my most interesting and enjoyable climbs. Instead of killing our calves on a boring incline it was more like rock climbing/jumping which made things much more entertaining. The last half mile or so to the summit is above the treeline for the most part and costs of slippery mossy rock faces and outcrops. The summit was easily 10-15F colder than a few hundred feet lower, partly because of additional the moisture and wind. The visibility was probably a few hundred yards, pretty disappointing for such a large undertaking compared to anything we had done previously.

We decided to take our summit lunch back at a warmer portion of the trail 0.5miles down. Our progress descending was much slower than anticipated. We made it back to our camp in 3hr 45 (only 25 minutes faster than the ascent). Because it was a lot of rocks and roots the downhill was much more strenuous on our knees and hip flexors. Where things really took a turn for the worse was when we had to put on our heavy packs. The 3.5 miles back to the car seemed never ending but we managed to make it back in 1hr 40 mins, on a portion of the trail where the elevation change was mostly a wash.

Takaway:
In all, it was a great experience. Everything went according to plan and no one got injured despite a few close calls. The summit and hiking conditions were a bit disappointing and the walk back was very taxing, but the hike up and feeling of accomplishment totally made it worthwhile.

Resources:
Peakbagger - lists the two routes as Van Hoevenburge Trail and Feldspar (Tahawus), has a great list of trail reports by other hikers
HighPeaksClimbing - Lists Adrondack Loj and Garden Parking Lot as two trailheads, refers to Phelps trail (turns into Johnsbrook trail) as the popular route from Garden Parking lot.
Keene Valley Hike Shuttle
My Big Adventure- very detailed picture hike using AdLoj route
Natural Born Hikers- another great photoblog using AdLoj route
Description of Johns Brook Trial
Description of Johns Brook Trail with Camping
Grace Camp