There are quite a few variations of rung geometry, both horizontal/vertical spacing and diameter. There are no official dimensions so I chose to go with spacing consistent with the most reliable source, laddergolf.com, which says:

Step 1: Materials
For 1 Rack
2 Sets of 3 Bollards:
Step 2: Cutting and Drilling

By using vertical pieces about 12” in length after the T’s are assembled it gives a spacing of about 13”. I chose to go with 3/4” PVC for durability reasons. Many people complain that 1/2” cracks or breaks after a fair bit of use.Glossary of Terms:
Bolas: A Bola consists of 2 golf balls attached together with a piece of nylon rope. Golf Balls are spaced 13” apart.
Ladder: The ladder is the structure that consists of 3 steps each spaced 13 inches apart.
Steps or Rungs: Each ladder has 3 steps. The top step is worth 3 points, the middle 2 and the bottom 1 point.
Toss Line: The line that the players tosses from. Officially is set to 15 feet. For backyard games 5 paces works fine.
For 1 Rack
- 19ft. of 3/4” PVC straight pipe
- 2x 3/4” PVC 90 elbows
- 6x 3/4” PVC Tees
- PVC Glue
2 Sets of 3 Bollards:
- 12’ of ⅜” rope
- 12 golf balls
- Some masking tape
- Something to melt the ends of the rope with
Step 2: Cutting and Drilling
- Cut the 18ft of 3/4” PVC into 5x24” and 8x12” pieces.
- Drill a 3/8” hole through each golf ball (Be careful with newer golf balls that have a liquid core... it could get messy!)
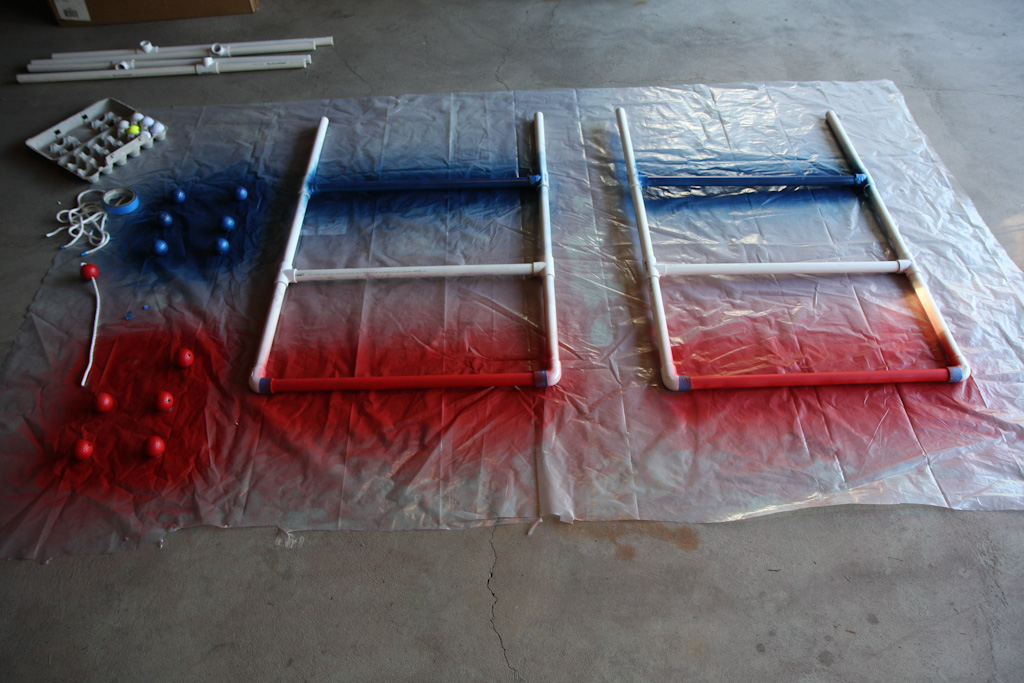
- Before you assemble things is a great time to paint things to make the set a bit more playful and colorful. I chose to go with patriotic colors Red and Blue, leaving one rung PVC White. And colored different bollard sets red and blue.
- Lay the pieces you want to paint out on a piece of plastic or cardboard and spray away. Make sure to get an even coat or two.
- Give the paint plenty of time to dry
Step 4: Cutting and Melting
- Wrap tape around the 3/8” rope every 24” (This will keep the rope from fraying when you cut it, and aid in the melting process)
- Cut in the middle of each piece of tape
- Melt one end of the pieces of rope using a lighter (Be careful and make sure that the melted portion doesn’t get larger than the 3/8” otherwise it won’t fit through the golf balls!)
- Tie a knot in one end of a piece, thread two balls on, and tie a knot on the other end making sure the balls are 13" apart. Cut the excess rope after the knot and melt the second end using the same process with tape as above.
- Remove the tape
- Before you begin gluing think about how you are going to store and transport the set, which will tell you which joints not to glue to allow disassembly. I glued the entire rack except for the feet to the frame.
- Glue the desired joints and let the glue set.

Great directions, very fun to build. Sturdy construction. My only criticism was the rope measurements. I found that 9' rope cut into 18" segments to be far too short. I'd recommend at least 13' cut into 24" segments. Once the 2 knots on the ends are tied and the length lost inside the golf balls, you are then left with the intended 13" between balls. Thanks
ReplyDeleteTom, thank you for the comment! I updated the dimension in my image and steps to match your recommendation. I also added a note about cutting off any extra after ensuring the balls are the correct distance apart.
Delete36' of pvc is a hair short for 2 racks. Total inches on one side is 227" divided by 12 is 18.58, times 2 per side is 37.16 feet, so 36 feet is short by about 2 feet.
ReplyDeleteDool, thanks for pointing that out! I updated the length per rack from 18 to 19 (considered rounding up to 20, but didn't want to be wasteful).
DeleteThank you for sharing this great article i hope its work to me and its helpful www.deesawalarubber.com
ReplyDeleteYour articles are inventive. I am looking forward to reading the plethora of articles that you have linked here. Thumbs up! country club ahmedabad
ReplyDeletehow far apart do you space the ladders plz?
ReplyDeleteI didn't glue mine, got an old camp chair bag and slid everything inside. Great for storing it.
ReplyDeleteGreat idea! Thanks for posting.
DeleteThis comment has been removed by the author.
ReplyDeleteThis comment has been removed by the author.
ReplyDeleteThis comment has been removed by the author.
ReplyDeleteThis comment has been removed by the author.
ReplyDelete